
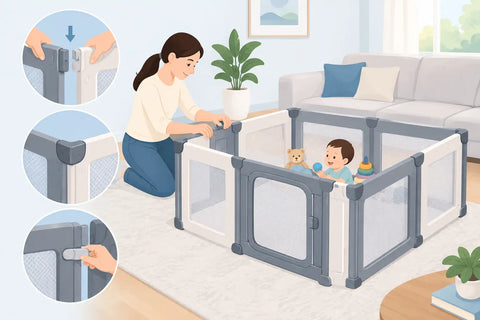
A modular playpen should feel reassuring from the moment the final panel clicks into place. If you are searching for how to assemble modular playpen panels safely, the goal is not simply to make an enclosed space. It is to create a secure, comfortable area where your little one can roll, crawl, sit and play while you stay close by.
Unlike a fixed cot or a one-piece play yard, a modular design gives you flexibility to shape the enclosure around your home. That flexibility is useful in a compact flat, an open-plan living room or a nursery that changes as your child grows. It also means each connection, panel position and floor surface deserves careful attention before playtime begins.
Before you assemble the modular playpen
Start with a clean, level section of floor. Avoid placing the playpen on a rug that bunches up, beside a step, or where it may be knocked by a door opening. Keep it away from windows, curtain cords, standing lamps, heaters and furniture that a child could use to climb out.
Unpack every component and lay the panels flat so you can see what you have. Most modular playpens include standard panels, a door or gate panel, connector pieces, anti-slip pads or suction bases, and sometimes stabilisers. Check the instruction manual for the intended panel order, especially if the gate panel uses different connectors from the rest of the system.
This is also the right time to inspect each part. Look for cracks, bent pins, loose caps or damaged hinges. A playpen that has been stored away or passed between family members may need a particularly careful check. Do not use replacement parts from another brand unless they are specifically approved for your model. Panels can look similar while having slightly different connection points or load limits.
Choose the right shape for your room
A square or rectangular layout is usually the most stable and practical option. It gives your child a clear play area and allows a matching play mat to sit neatly inside the panels. A gap-free fit matters because small gaps can collect crumbs, trap toys or create an uneven edge for new crawlers.
Some modular systems can form hexagons or wider custom shapes. These can work well in a larger room, but every extra angle adds another connection to check. If your child is beginning to pull up or cruise along the panels, a simpler shape is often the better choice because it is easier to inspect and less likely to shift on the floor.
How to assemble a modular playpen step by step
Begin by connecting two panels on the floor according to the manual. Align the hinge sections fully before pressing or sliding in the connector. You should not need to force a piece into place. If it feels tight, remove it, check the orientation and try again rather than pushing hard enough to damage the joint.
Continue adding panels one at a time, keeping the bottom edges level as you work. It is helpful to build the enclosure loosely first, particularly for a larger configuration. Once you have confirmed the shape and the gate is positioned where you want it, secure each connection fully.
Fit the gate panel somewhere convenient for adults to reach without climbing over the side. Ideally, it should open away from nearby furniture and have enough clearance for you to carry your child comfortably. Make sure the locking mechanism faces the correct way and can only be opened by an adult following the manufacturer’s instructions.
When the final panel joins the first, check that the enclosure sits evenly. Attach any anti-slip feet, suction cups or stabilising components included with the product. These features are designed to reduce movement, but they work best on a clean, smooth surface. Dust, textured flooring and uneven grout lines can limit their grip.
If your playpen is designed to work with a dedicated play mat, place the mat inside only after the frame is secure. A premium, high-density foam mat can provide a more comfortable surface for tummy time and soften everyday tumbles. Choose a mat that fits the internal dimensions properly rather than folding or forcing an oversized mat beneath the panels.
Carry out a proper safety check
Assembly is not complete when the playpen looks right. Take a minute to test it as your child will. Walk around the outside and press gently against every panel. The enclosure should feel stable, with no panel leaning outward or connector lifting away from the floor.
Check that every hinge is completely engaged and that any caps, locks and fasteners are fitted. Open and close the gate several times, confirming that it latches securely each time. Then run your hand along the inside edges to make sure there are no sharp points, splintered areas or exposed gaps.
A few quick checks make a meaningful difference:
- Ensure the base is flat, dry and free from loose objects.
- Confirm that panels cannot slide easily across the floor.
- Remove cushions, large soft toys and climbable furniture from inside the playpen.
- Keep the gate locked whenever your child is playing inside.
- Recheck the enclosure after moving it, cleaning underneath it or changing its shape.
Common assembly mistakes to avoid
The most common mistake is leaving one connector only partially attached. It may appear secure at first but loosen when your child leans against the panel. Work methodically around the playpen and visually check each join rather than assuming a click was enough.
Another issue is placing the playpen too close to tempting objects. A low sofa, coffee table or storage unit can become a climbing aid as your child becomes more mobile. Leave a clear perimeter around the outside, including behind the gate.
Parents sometimes add a loose blanket or thick rug beneath the playpen to make it softer. This can affect stability and create uneven edges. A correctly sized, non-slip play mat is a safer and more polished solution, especially when designed as part of a compatible playpen-and-mat set.
Finally, resist the temptation to extend a system beyond its approved configuration. More panels can create a generous play zone, but only where the manufacturer permits it and provides the appropriate stabilisers. Stability depends on the complete setup, not just the strength of an individual panel.
Keeping the play area clean and ready
A playpen earns its place in family life because it is used every day. Wipe down panels regularly with a soft cloth and a child-safe cleaner, following the care instructions for your specific materials. Pay attention to hinges and corners, where dust and food crumbs can gather.
For foam play mats, clean spills promptly and allow the surface to dry fully before placing your child back inside. Avoid harsh products that may damage the finish or leave residue. A hygienic play space is especially valuable when babies spend much of their time close to the floor, exploring with their hands and mouths.
As your child grows, reassess the layout. A smaller setup may suit early rolling and tummy time, while a wider area can give an active crawler room to explore. RaaB Family’s coordinated playpen and play mat solutions are designed to help parents create a tidy, comfortable play zone without compromising on safety or modern home styling.
The best setup is one you can trust at a glance: panels firmly joined, gate locked, floor clear and your child comfortable on a supportive surface. Once those details become part of your routine, the playpen can give your little one space to explore and give you a little more confidence in the everyday moments around them.